
We have been exploring the Self Sovereign Identity (SSI) space for quite some time and today we came up with the first implementation of SSI specification proposed by W3C credential community.
Disclaimer
This is going to be a long blog since a lot of concept needs to be explain. But I will try to do full justice to your time by explaining SSI with a visual demonstration using a simple use case on Hypersign Studio.
Self-sovereign identity
Self-sovereign identity intent to give control of user data back to the user by leveraging the use of technologies like Public Key Infrastructure (PKI) and Blockchain. In SSI ecosystem, each party (issuer, holder, verifier) can create their own identifier, called Decentralised Identifier (DID), by publishing their public key on the public blockchain network and can verify each other independently.
One of the problem which SSI solves is, It gives ability to all participants to authenticate each other and to the verifier to verify the data independently - without making a call to the issuer. The issuer does not have to be online at the time of verification!
To understand the concept of SSI in-detail, I encourage you to read this blog before proceeding. To understand why Blockchain plays a major role in SSI infrastructure, please read this blog.
Hypersign
Now that we have some understanding of SSI, we need to think of a way to implement it. Many people are already taking that step to bring SSI to end-user. In-fact there is a dedicate community, W3C Credential community, working on this.
Hypersign is an Identity layer built on the æternity blockchain network and is designed to provide a self-sovereign identity for earth’s seven billion humans and their devices.
Hypersign implements SSI specification and has released its version - v1.0 in the form of POC. In this version, blockchain is not used but most of the concepts of SSI can be understood very well. The complete roadmap for Hypersign can be found in this thread.
Components
- Hypresign Identity Explorer: Is basically a view for Hypersign blockchain. It also provides a way to create DIDs.
- Hypersign Studio: Is a web portal where verifiable credential can be issued by the issuer, verifiable presentation can be generated by holder/subject and it can be verified by the verifier.
Case Study
Let’s try to understand the flow with a case study - Flight Ticket Booking System.
A passenger - Vishwas, requests a flight ticket for Chennai to Patna from XYZ Airline company. Once the ticket is issued, he goes to the airport to presents his ticket (with other credentials like a passport or voter id etc.) to the security personal - David, at the security check. David verifies the ticket and lets him enter into the boarding area.
In this case study we have the following actor:
- XYZ: The airline company - the issuer.
- Vishwas: The passenger - the holder/subject
- David: The security personal - the verifier.
Note, in this case study, security personal does not belong to the same system where the ticket was issued. So the only way left for him to verify the ticket is - manually - which can lead to major security breach.
Get DID using Hypersign Indentity Explorer
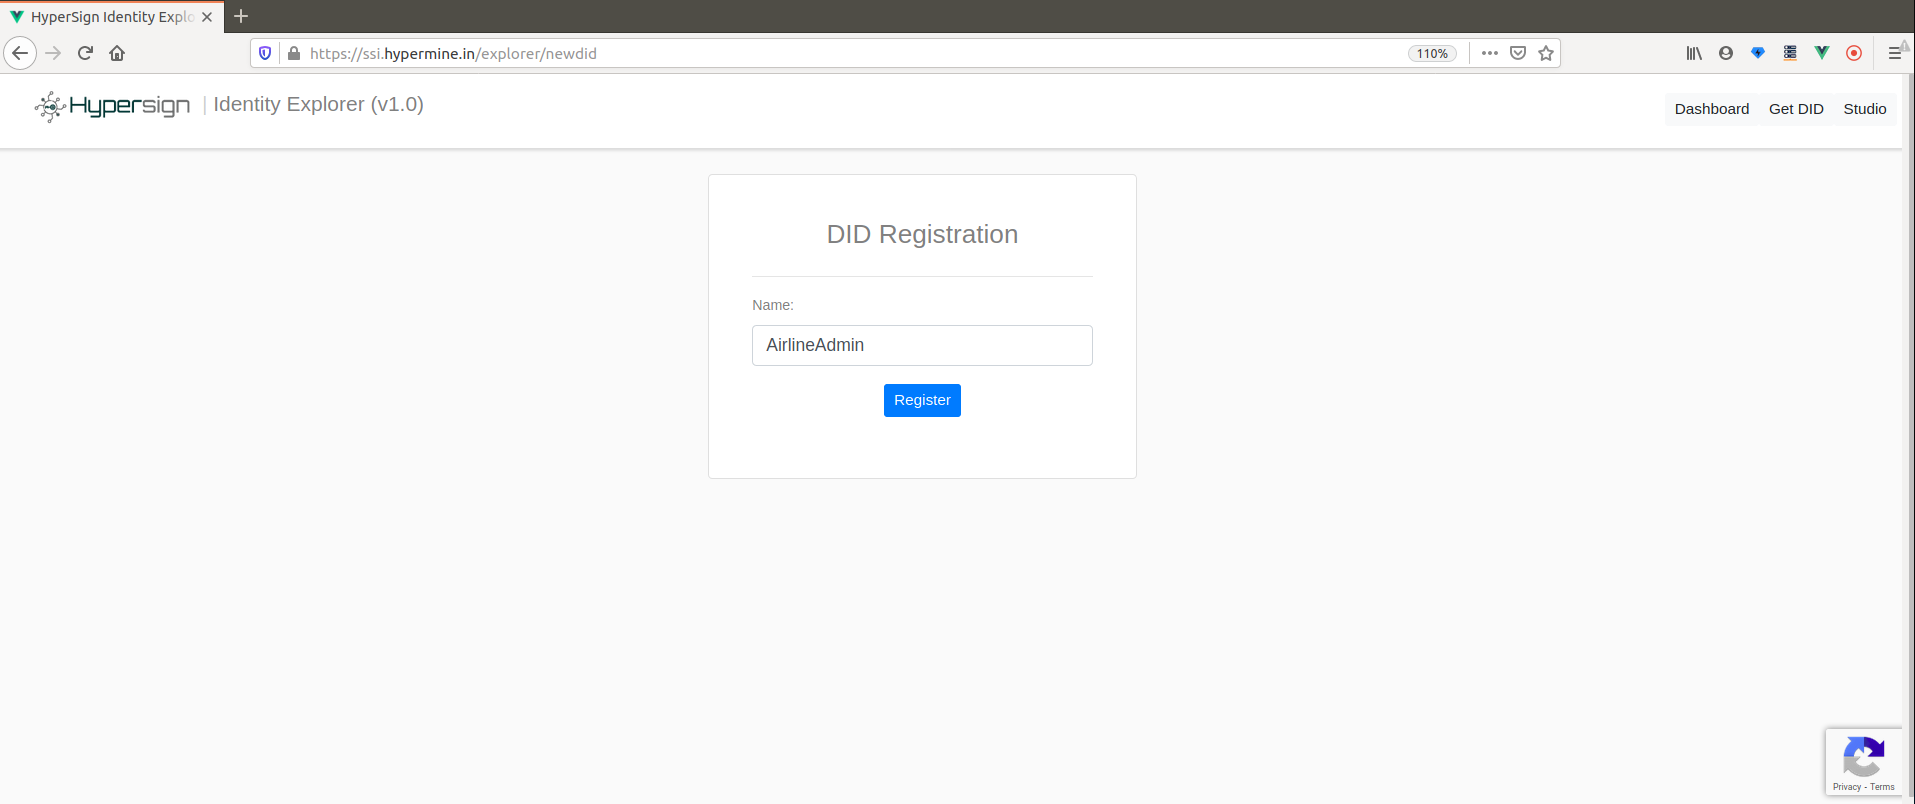
As we discussed earlier, in SSI ecosystem, all actors can issue DIDs to themselves. To create a DID go to Hypersign Identity explorer and click on Get DID button in the navbar.
Click on Register button after filling your name. Remember, this information is going to be on the open network hence you only enter details which you want to make public. Let’s say for this demo we act as admin, AirLineAdmin, of airline company.
On clicking on Register button, user’s private-public keys generated (keys.json file) and DID gets created on our dummy network. You can download your keys and store it on your computer for later use. The step of creating DID will not be facilitated from the Identity explorer but from Hypersign mobile wallet - which is currently under development.
The keys.json file contains your privateKey and publicKey. Let’s take a look:

Once the DID is created, you can see your DID and DID Document on the network:
did:hs:7d0a59c6-f693-47d2-9c18-9fdf9e5e7c3e
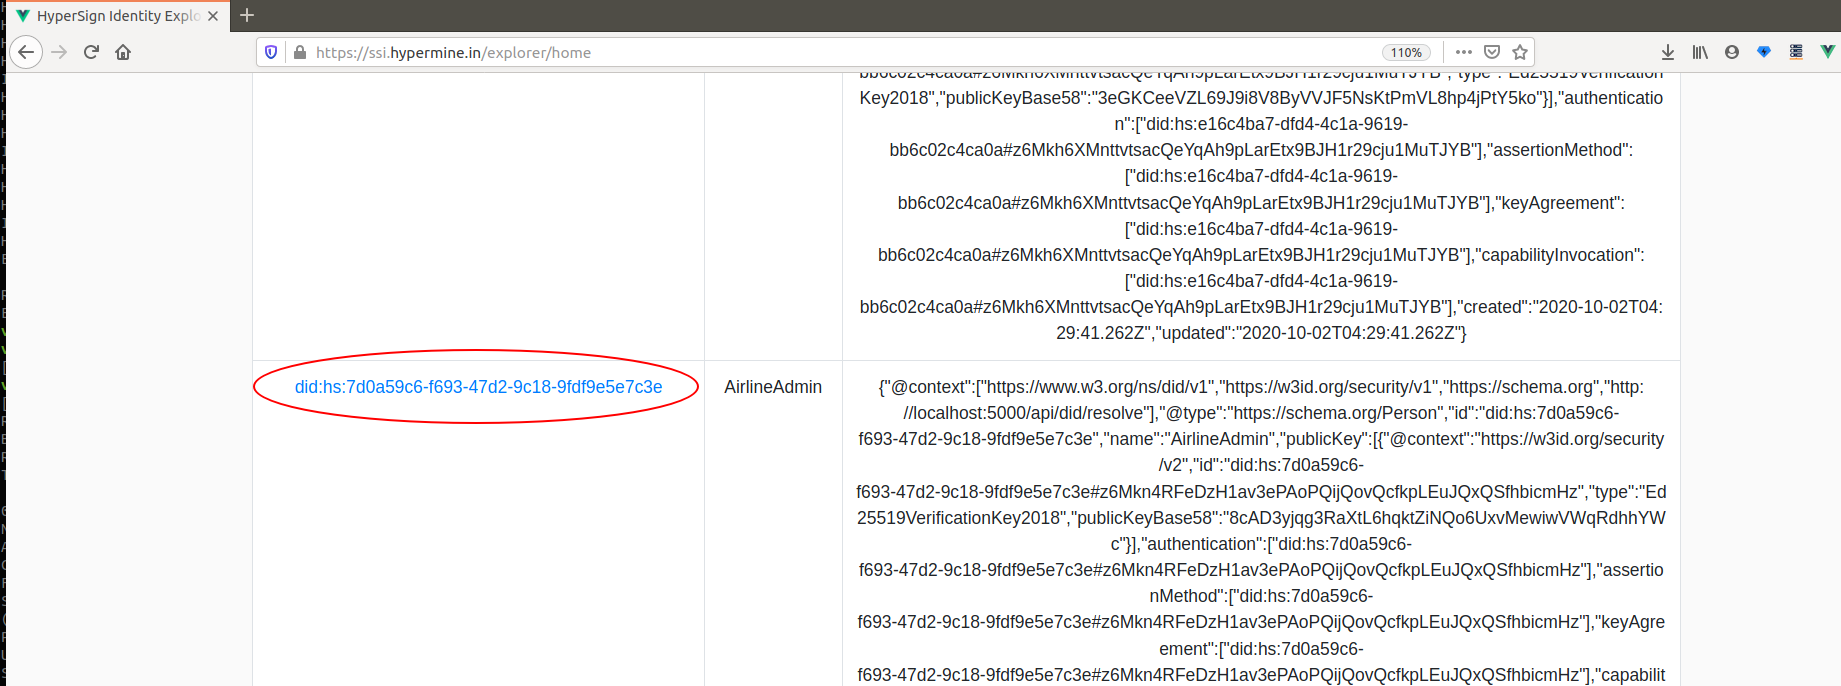
Click on your DID in the table to see your DID document:
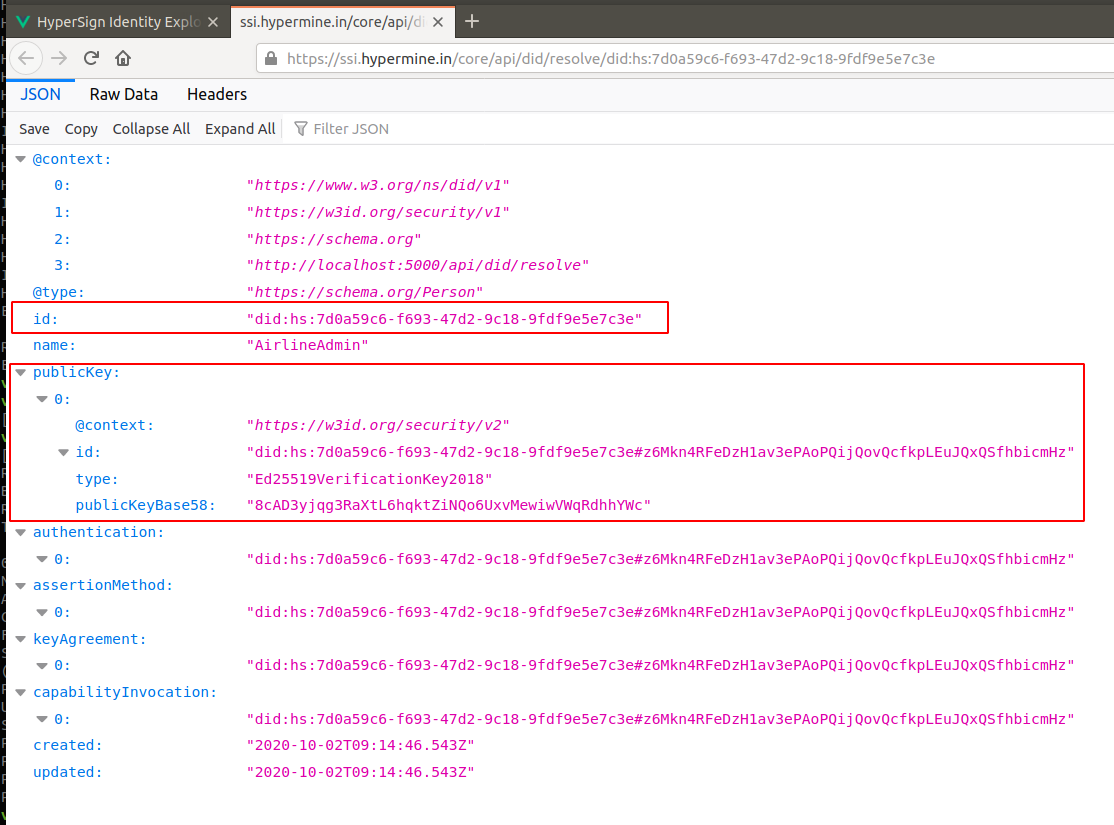
The DID doc, contains your DID, public key and other public information including the alias,AirlineAdmin which you have used.
Ideally, all three actors will have their own DIDs. But for the sake for this demo, let’s just use one DID of the admin and he can act as issuer, holder and verifier all three.
Get onboard on Hypersign Studio
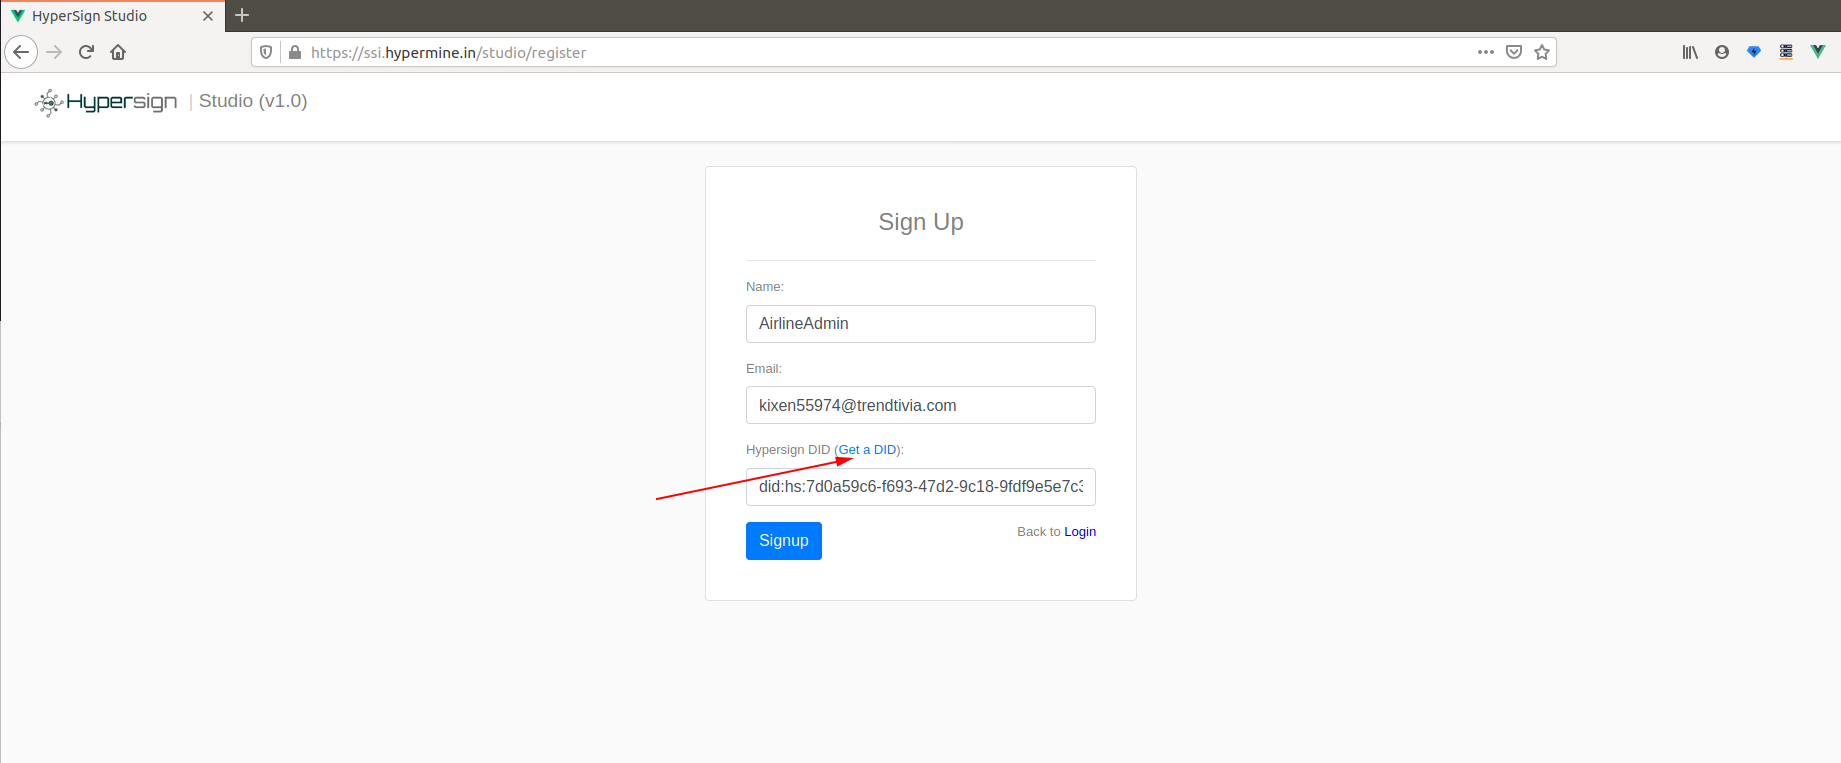
Now that we have DID, let us go to Hypersign Studio to play with verifiable credentials. To issue credentials, let’s first register and login into this Hypersign Studio web portal.
Register
Go to Hypersign Studio and click on the signup link to register. Fill in your details and click on SignUp button. Make sure you fill the DID as well which you had generated in the previous step.
On clicking on SignUp button, you will receive an email and will be asked to click on a link to download verifiable credential file.
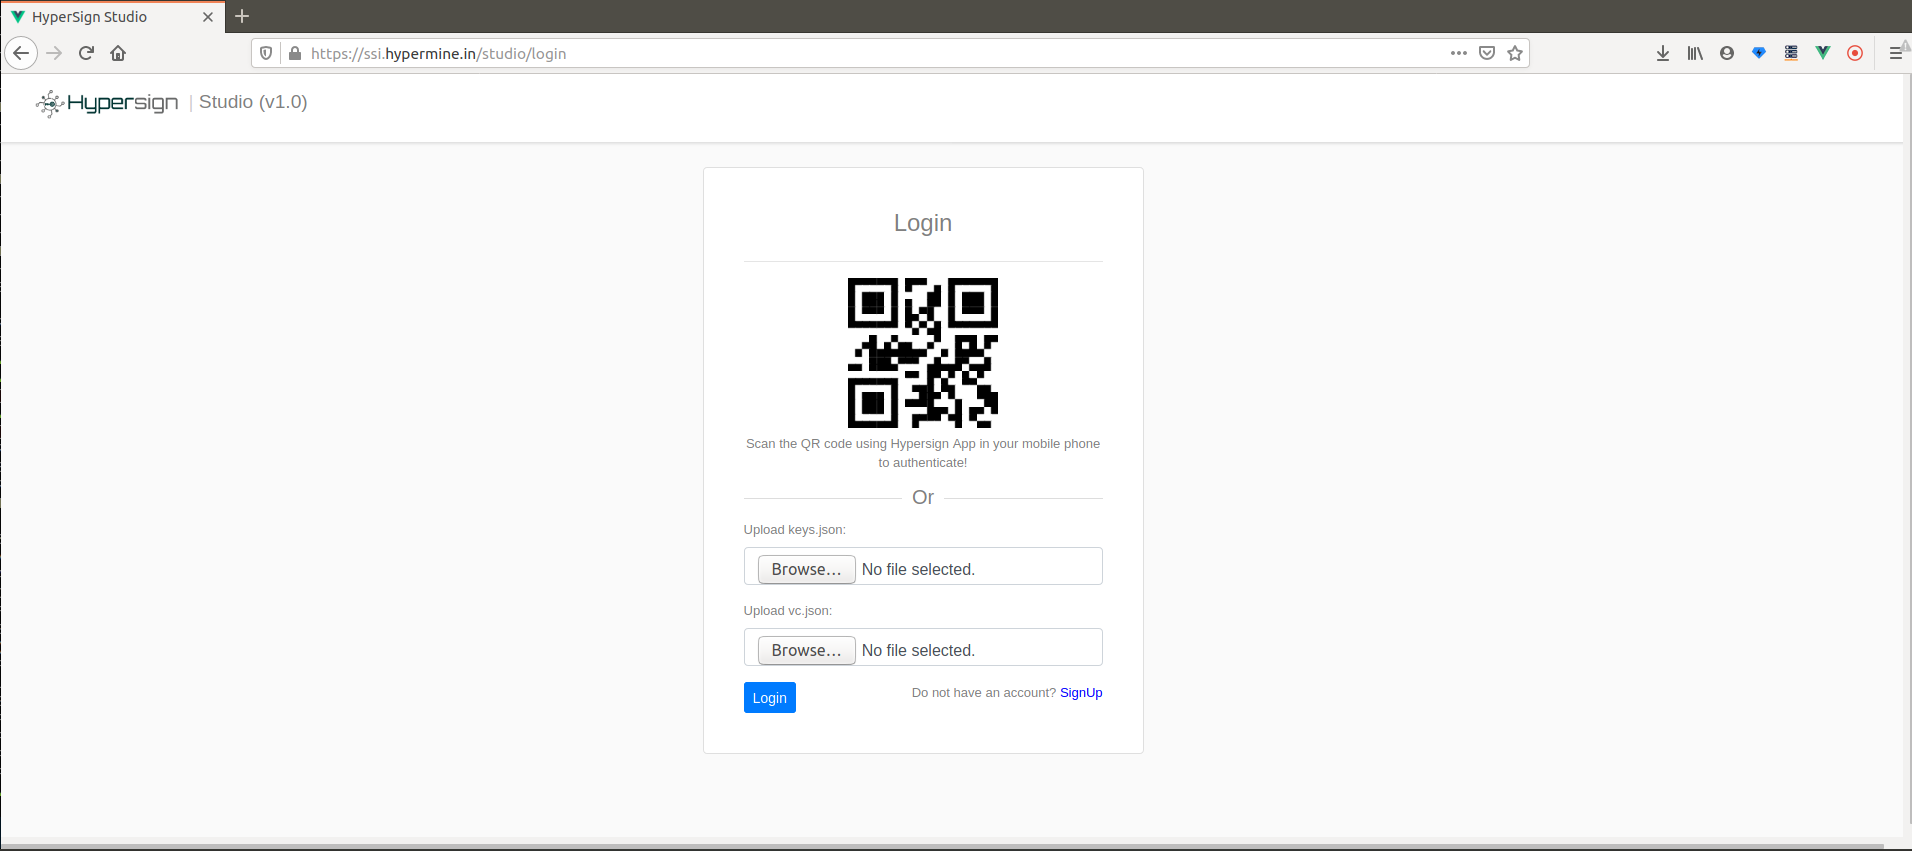
Login
Now you have two files, keys.json and vc_fe4..925.json (don’t worry about the complexities like why we are using files to login and all, it will be clear in the end). Use both of these files to login into the studio app. We can skip the scanning QR part since we do not have mobile wallet at moment.
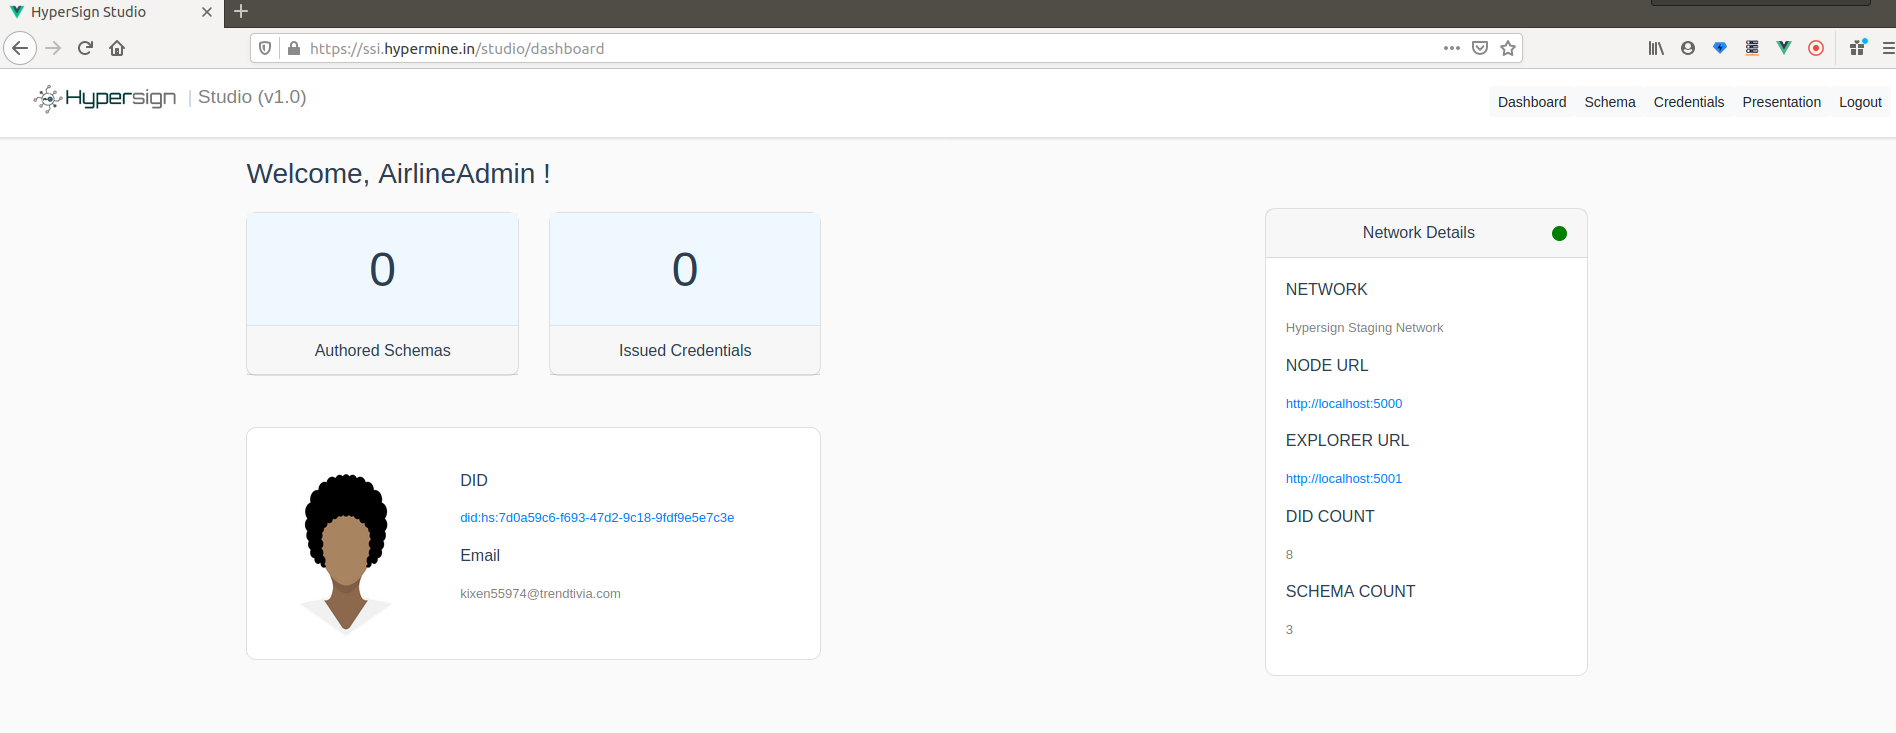
Dashboard
On the successful login, you will enter into the dashboard, where you can see some of the basic details like, number of schema created, number of credentials issued, your profile and network details. See the fig below:
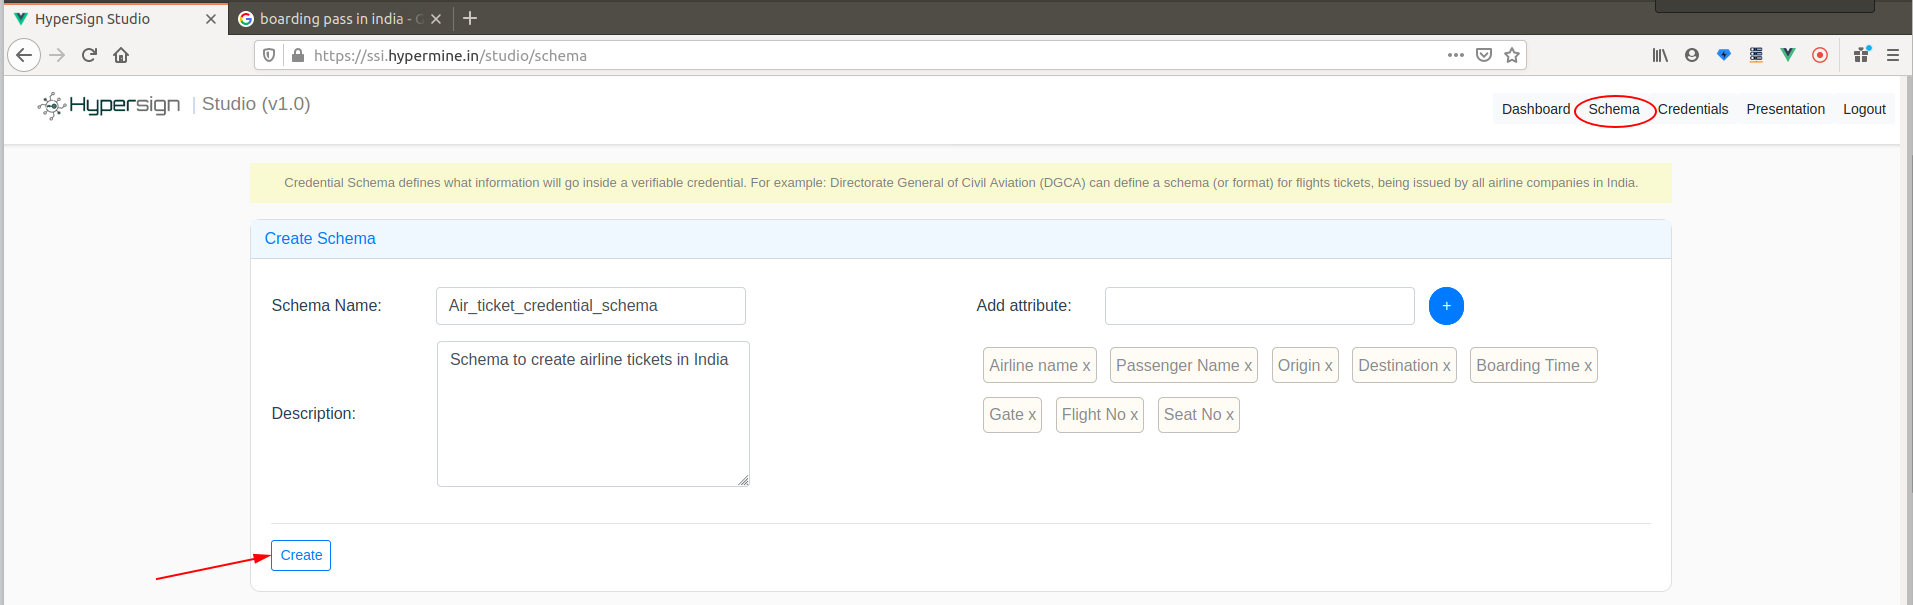
Create schema
Now that you are into the app, you can plan to issue flight ticket to a passenger (to you in this case). To issue a ticket, the ticket must have a schema. The Schema is nothing but format (defined by aviation governing body, say DGCA in India) which can decide what format all airline companies should follow to issue airline tickets in India. The standard format is important for different systems to understand each other and work together.
So let us assume that airline company itself is that aviation body for sake of simplicity. Click on Schema button in the nav to go to the schema page. A schema must have a name and required attributes (basically what fields) - fill those details and click on Create button. We should also note that when the schema is created, it can be public so that other issuer can use that schema to issue verifiable credentials.
Issue credential
Let’s us go ahead and issue a flight ticket using the schema which we created in the previous step. The first thing which is required here is, to whom are you going to issue the ticket/credential? i.e. the passenger of the subject. Let’s say you are issuing to yourself.
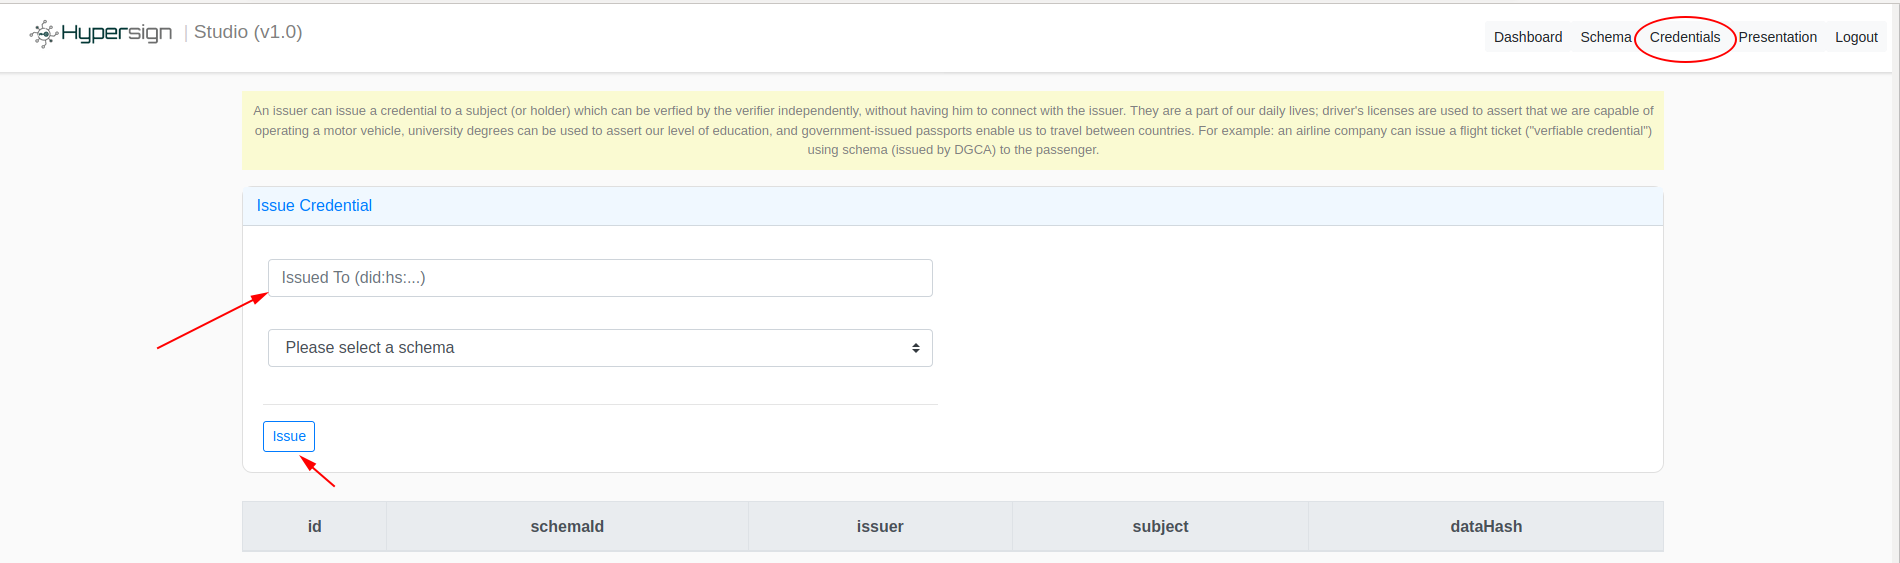
Fill in the holder DID and select the Air_ticket_credential_schema schema. On selecting the schema, you need to fill the defined attributes. Click on the Create button after filling the form.
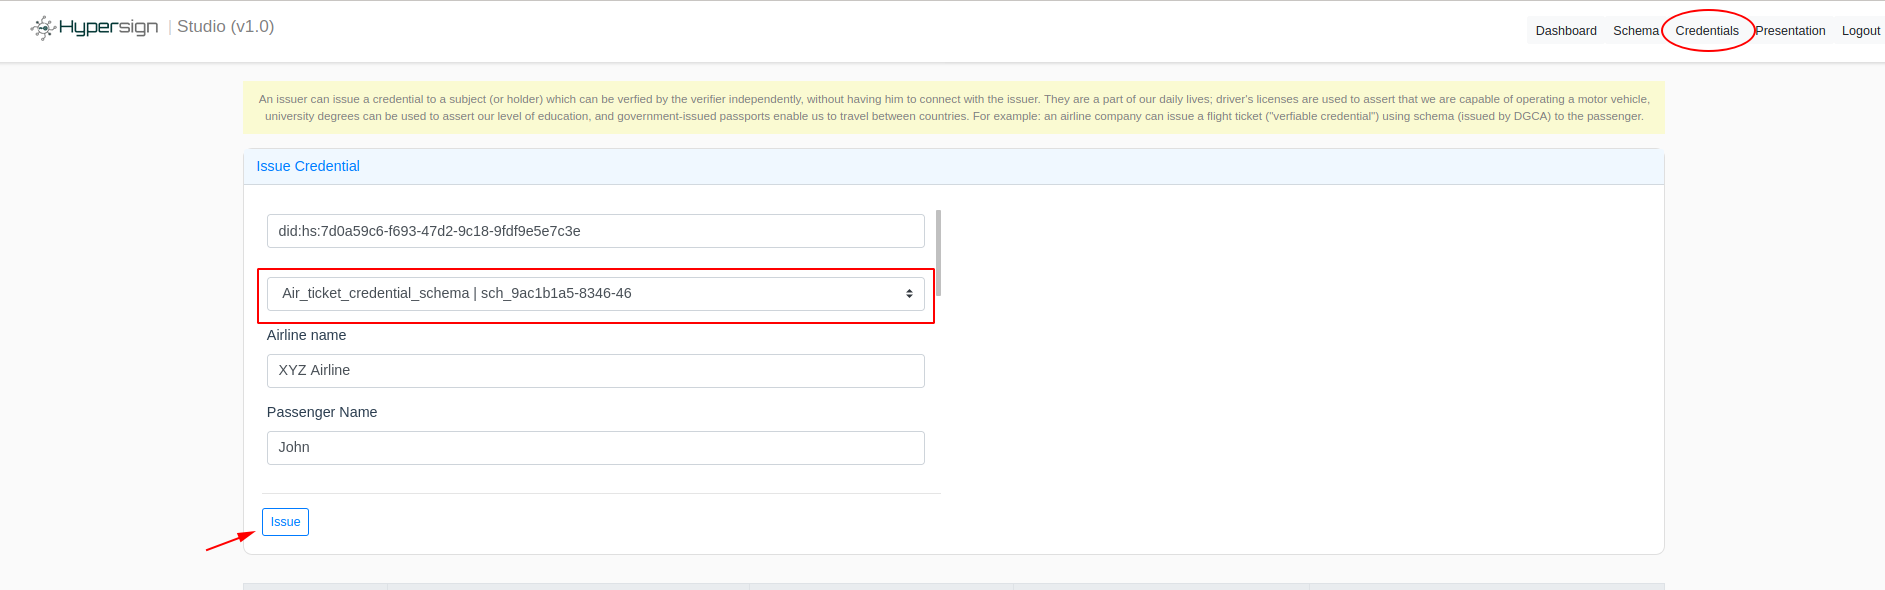
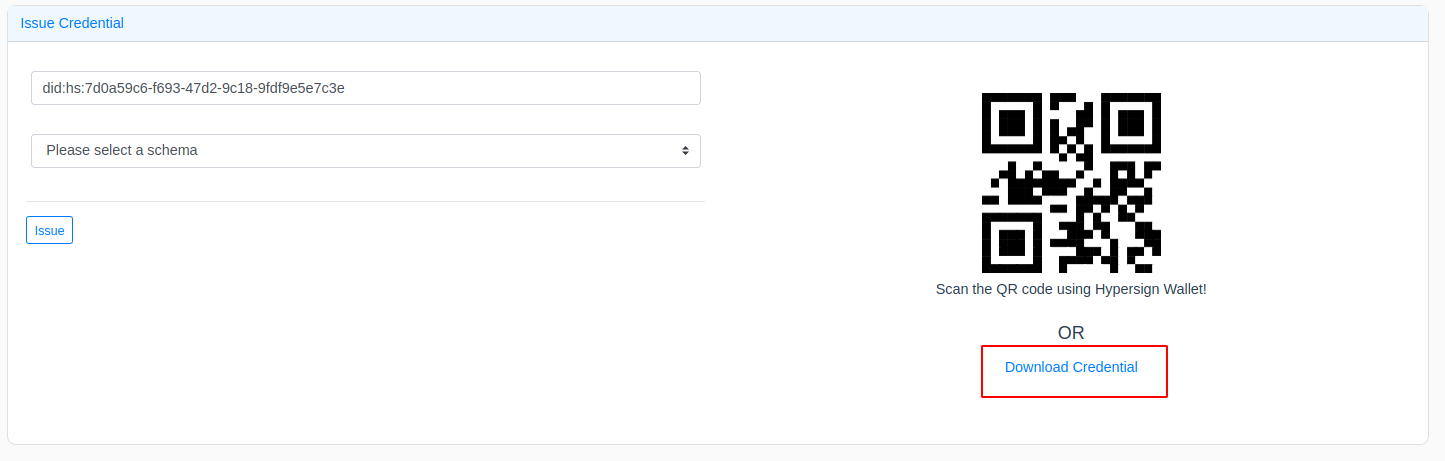
A ticked in the form of verifiable credential is issued. Click on download to see the credential.
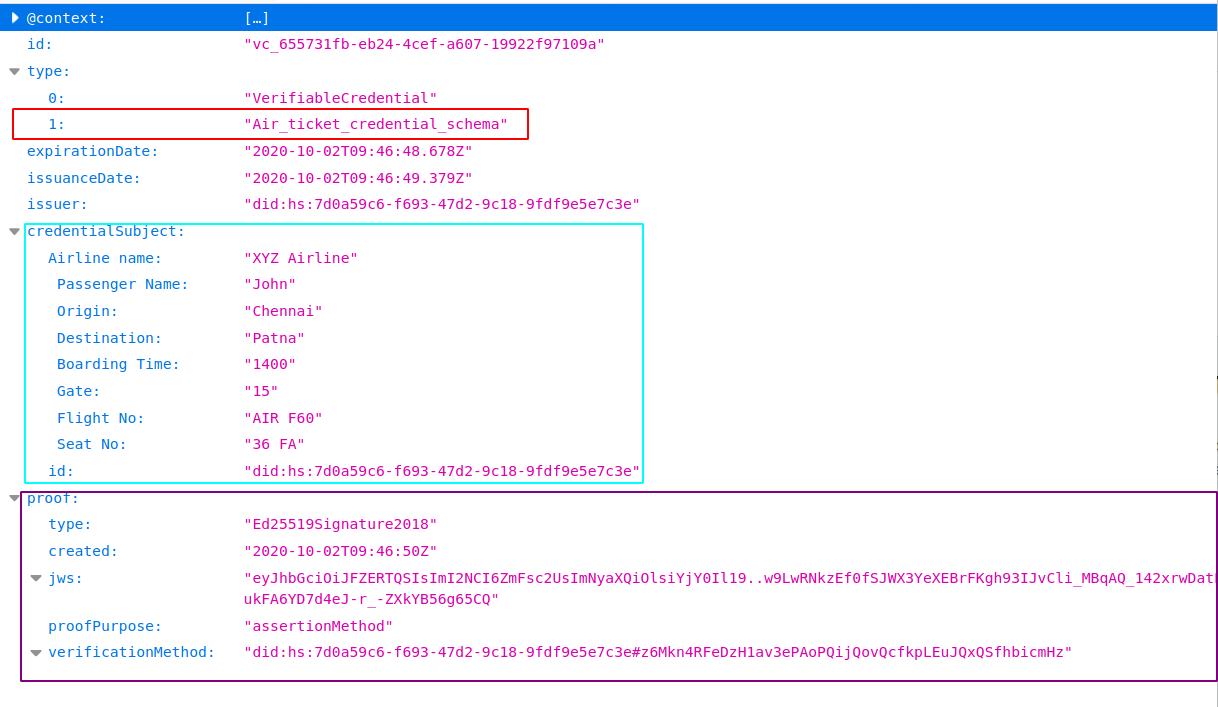
In this credentials, you can see the following details.
- type: tells what is the type of this verifiable credentials. In our case it is,
Air_ticket_credential_schemaschema. - credentialSubject: tells claims about the subject like passenger name, source, destination, fare etc.
- proof: contains the digital signature of the issuer. It also contains publicKey identifier, the type of signature (what is the algorithm used for the signature?) and proof purpose.
Take a look at the fig below:
Generate Presentation
Now that you have issued credential to the subject/holder (in this case you are the subject), you can send it via some means of communication (ideally it would be, DID communication protocol) to the subject. The subject then has to generate something called verifiable presentation which is essentially a doc containing the verifiable credentials and the signature of the subject. The subject can also have the ability to share partial information or hide information but share only the proof that he has that information (Zero-knowledge proof).
Let’s create a verifiable presentation with our credential. To create a presentation, click on the Presentation tab in the nav. Upload the verifiable credential (the flight ticket) and click on Generate button.
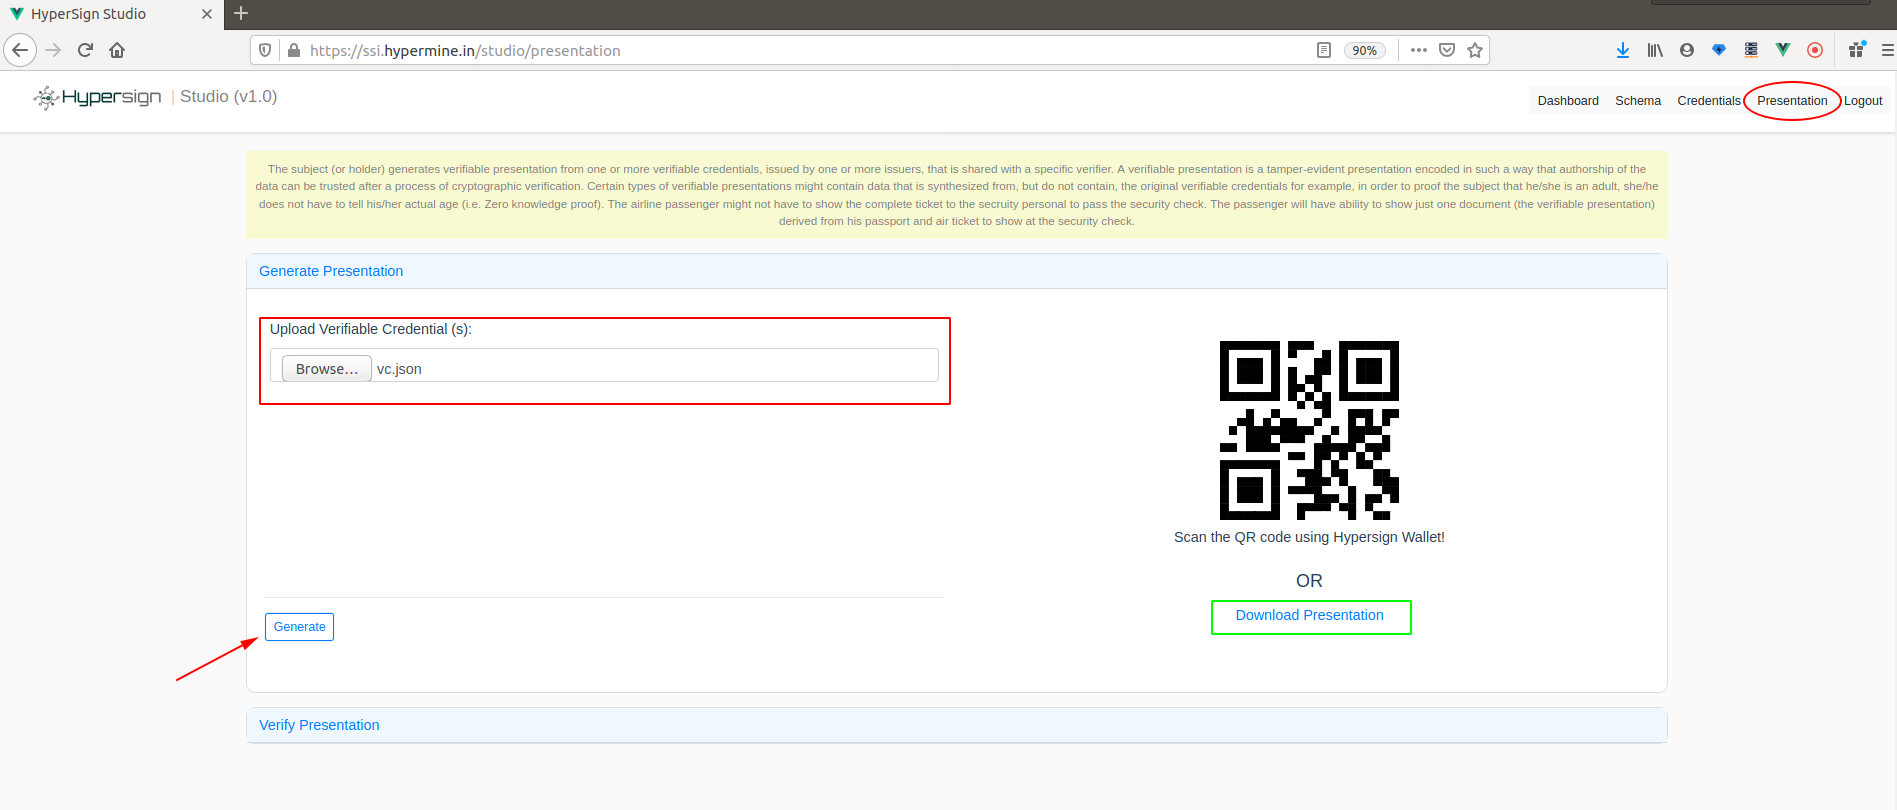
Once the presentation is generated, click on Download Presentation link to download the presentation and open it in some notepad to understand what it contains.
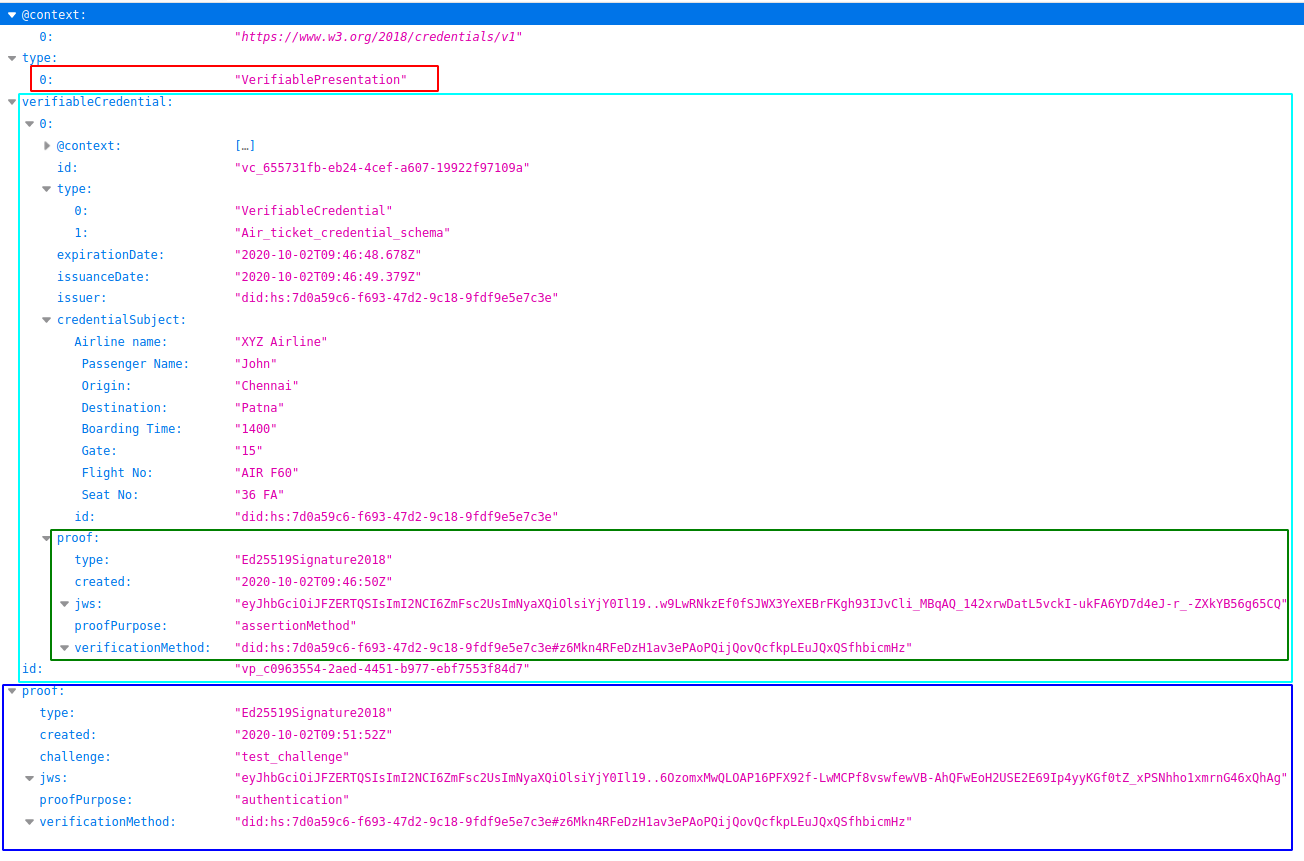
In this VP you can see the following details:
- type: type of the document,
VerifiablePresentation. - verifiableCredential: list of credentials. In our case, it has just one entry - the ticket which was issued.
- proof: contains the digital signature of the subject. It also contains the publicKey identifier, the type of signature (what is the algorithm used for the signature?) and proof purpose.
Note that a verifiable presentation contains proofs of issuers as well as proof of the subject. Its means that the verifier has to know both these things, who is presenting the credential? and who has issued the presentation to whom?
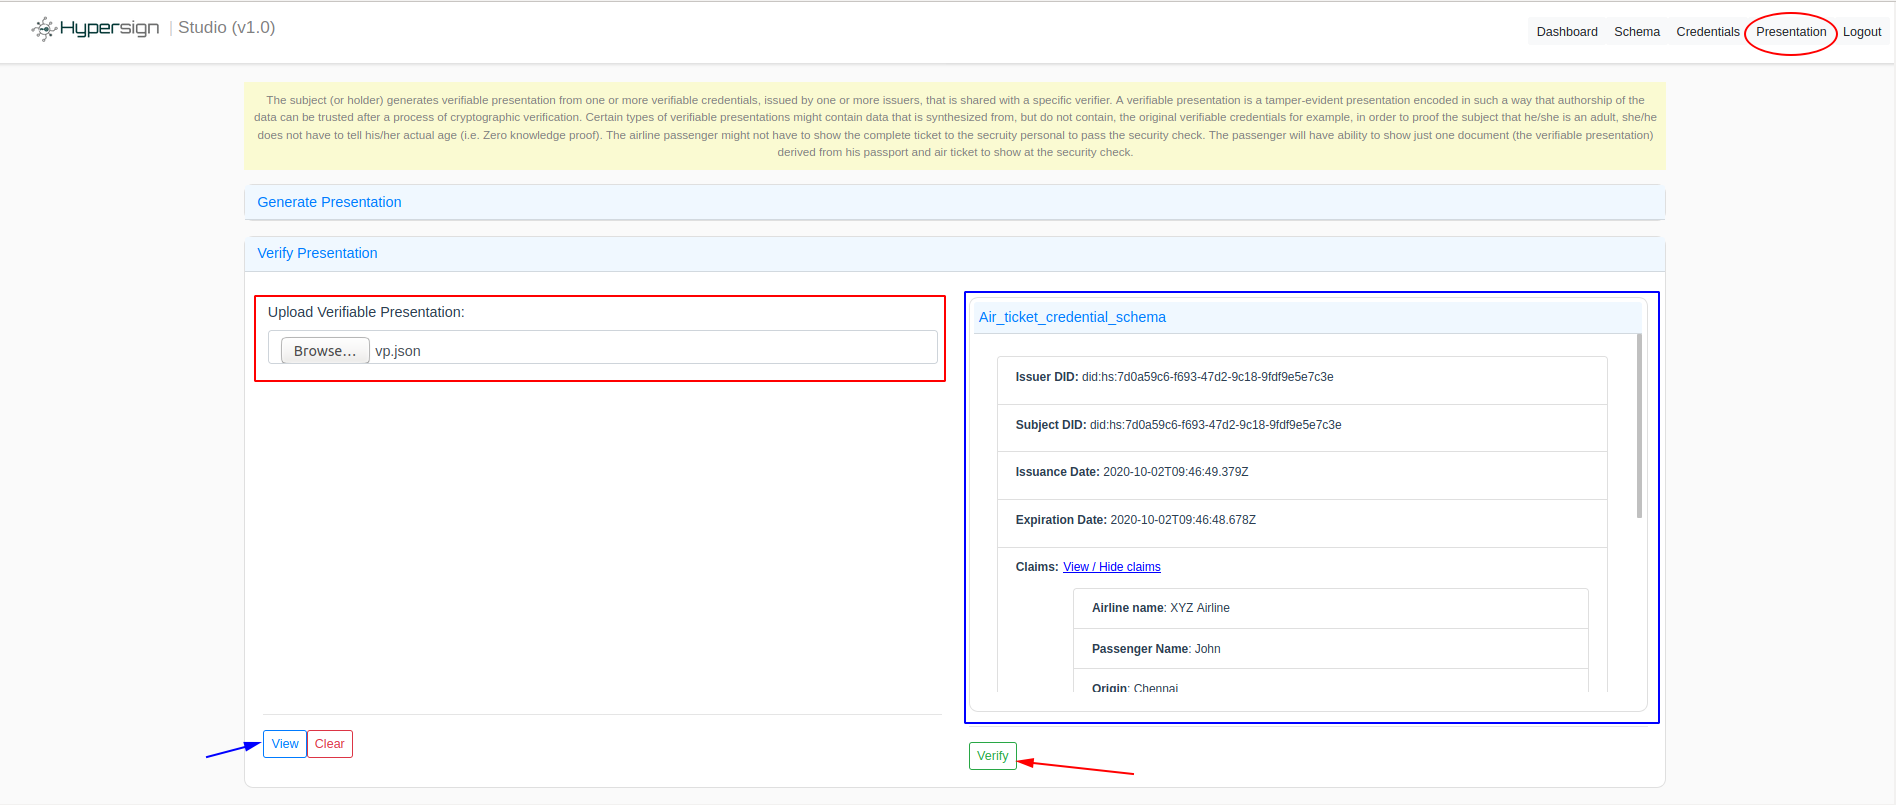
Verify Presentation
Now the presentation is generated by the subject or passenger, he can give that to security personal to verify the ticket. Let’s us assume, you are also the verifier. So in order to verify the presentation, click on the Verify Presentation section in the Presentation page and upload the verifiable presentation which you have generated in the previous step. On clicking on View button, the verifier can view the details of document like issuer, subject, claims etc.
Once he satisfies with information, he can click on the Verify button to verify the digital signatures. Take a look below:
Final words
As you can see how credential can be easily generated on Hypersign studio and can be verified by the verfier without having to make call to the issuer. The complexities of files are there because we do not have mobile wallet, once that is there, user would not have to manage those files manually, data can be transmitted between parties using DID communication protocol very securely.
So this was the demo of SSI, but did you notice that how you have actually used verifiable credential to be able to authenticate your self in the Hypersign studio portal? That is the live example of using SSI in your project. What problem did it solve and how it is much better than traditional username password or social login mechanism, I will leave that for our next blog.
I hope I did justice to your time. Feedbacks and criticism are most welcome! :)
Live demo
Watch the live demo on YouTube;
Important Links
- Hypersign Studio
- Hypersign Identity Explorer
- Github Repository
- If you are a developer, join our telegram group.
- For a more technical blogs on identity and SSI, please visit our Lab’s website
- Follow us on twitter to get the latest updates of this project.
- For business-related queries, kindly mail us at
connect@hypermine.in - Hypersign Website